The Maillard Reaction Meets Forced Convection: Understanding the Magic
The secret to incredible air fryer chicken, garlic parmesan or otherwise, lies in understanding two key principles: the Maillard reaction and the science of convection. The Maillard reaction is a complex chemical process between amino acids and reducing sugars that occurs when food is heated, resulting in browning and the development of complex flavors. It’s what gives seared steak, toasted bread, and, crucially, properly cooked chicken its characteristic deliciousness. An air fryer, unlike a conventional oven, uses forced convection – circulating hot air rapidly around the food. This rapid circulation promotes even cooking and encourages the Maillard reaction on all surfaces, leading to that coveted crispy texture. However, this intense heat also means that moisture can evaporate quickly, resulting in dry chicken if the process isn’t carefully controlled. We need to maximize the Maillard reaction *without* sacrificing moisture.The Ultimate Garlic Parmesan Air Fryer Chicken Recipe
 Here’s a recipe meticulously crafted to deliver perfectly cooked, intensely flavorful garlic parmesan air fryer chicken every time:
Ingredients:
- 1.5 lbs boneless, skinless chicken breasts (about 3 medium), pounded to an even thickness of about 1/2 inch
For the Brine:
- 4 cups cold water
- 1/4 cup kosher salt
- 1/4 cup sugar
- 2 cloves garlic, minced
- 1 teaspoon black peppercorns, cracked
For the Garlic Parmesan Coating:
- 1 cup grated Parmesan cheese (freshly grated is best!)
- 1/2 cup panko breadcrumbs
- 2 tablespoons olive oil
- 2 tablespoons grated Parmesan cheese
- 4 cloves garlic, minced
- 1 tablespoon Italian seasoning
- 1 teaspoon garlic powder
- 1/2 teaspoon onion powder
- 1/4 teaspoon red pepper flakes (optional)
- Salt and black pepper to taste
Instructions:
- Brine the Chicken: In a large bowl, whisk together the water, salt, sugar, minced garlic, and cracked peppercorns until the salt and sugar are dissolved. Submerge the chicken breasts in the brine, ensuring they are fully covered. Cover the bowl and refrigerate for at least 30 minutes, or up to 2 hours. The brine will help to tenderize the chicken and keep it moist during cooking.
- Prepare the Garlic Parmesan Coating: In a shallow dish, combine the grated Parmesan cheese, panko breadcrumbs, olive oil, minced garlic, Italian seasoning, garlic powder, onion powder, and red pepper flakes (if using). Mix well until all ingredients are evenly distributed. Season with salt and pepper to taste.
- Prepare the Chicken: Remove the chicken breasts from the brine and pat them completely dry with paper towels. This is crucial for achieving a crispy coating.
- Coat the Chicken: Dredge each chicken breast in the garlic parmesan mixture, pressing firmly to ensure the coating adheres well. Make sure the chicken is completely covered on all sides.
- Air Fry the Chicken: Preheat your air fryer to 380°F (190°C). Lightly grease the air fryer basket with cooking spray. Place the coated chicken breasts in the air fryer basket in a single layer, ensuring they are not overcrowded. You may need to cook them in batches.
- Cook the Chicken: Air fry for 12-15 minutes, flipping halfway through, or until the internal temperature reaches 165°F (74°C). Cooking time may vary depending on the thickness of the chicken breasts and the model of your air fryer.
- Rest and Serve: Once the chicken is cooked through, remove it from the air fryer and let it rest for 5 minutes before slicing and serving. This allows the juices to redistribute, resulting in even more tender and flavorful chicken.
- Garnish (Optional): Sprinkle with extra grated Parmesan cheese and chopped fresh parsley for garnish.
My Quest for the Perfect Air Fryer Chicken: An Investigation
Like many of you, I initially thought air frying chicken was as simple as tossing it in and pressing start. My first few attempts were a disaster – either the chicken was dry and rubbery, or the coating was burnt while the inside was still undercooked. I knew I needed to approach this scientifically.The Brine Breakthrough
My initial thought was that the air fryer was simply too efficient at removing moisture. I tried reducing the cooking time and lowering the temperature, but the results were inconsistent. Then, I had an “Aha!” moment: brining. I knew that brining could help the chicken retain moisture during cooking, but I hadn’t considered how crucial it would be in the intense environment of an air fryer. After experimenting with different brine solutions, I settled on the one in the recipe above. The salt helps to denature the proteins, allowing them to hold more water, while the sugar balances the saltiness and adds a touch of sweetness. The garlic and peppercorns infuse the chicken with subtle aromatics. Brining transformed the chicken from dry and bland to juicy and flavorful.Coating Calamities and Crispy Conversions
Next, I tackled the coating. My first attempt involved simply tossing the chicken in grated Parmesan cheese. The result? A soggy, uneven mess. The cheese melted too quickly and didn’t adhere properly. I experimented with different types of breadcrumbs – plain, Italian-seasoned, even crushed crackers. Nothing seemed to give me that perfect crispy texture I was after. Then, I tried panko breadcrumbs. Their larger size and irregular shape created a much more satisfying crunch. Adding olive oil to the mixture helped to bind the ingredients together and promote browning. The combination of panko breadcrumbs, Parmesan cheese, garlic, and Italian seasoning proved to be the winning formula. I also discovered that patting the chicken completely dry after brining was essential for ensuring the coating adhered properly.Temperature Trials and Timing Triumphs
Finally, I focused on the cooking temperature and time. I started at 400°F (200°C), but the coating burnt before the chicken was cooked through. Lowering the temperature to 350°F (175°C) resulted in chicken that was cooked through but lacked the desired crispiness. After several trials, I found that 380°F (190°C) was the sweet spot. It allowed the coating to brown beautifully while ensuring the chicken cooked evenly and remained juicy. The cooking time also played a crucial role. I initially overcooked the chicken, resulting in dryness. I learned to rely on a meat thermometer to ensure the chicken reached an internal temperature of 165°F (74°C) without overcooking.The Foolproof Technique: Achieving Air Fryer Chicken Perfection
After countless experiments and taste tests, I’ve distilled the process down to a simple, foolproof technique:- Brine for Moisture: Always brine your chicken for at least 30 minutes to ensure it stays juicy and tender.
- Pat Dry for Crispiness: Thoroughly pat the chicken dry with paper towels before applying the coating.
- Panko for Crunch: Use panko breadcrumbs in your coating for the best crispy texture.
- Don’t Overcrowd: Cook the chicken in a single layer, ensuring there’s enough space for air to circulate.
- Temperature Control: Preheat your air fryer to 380°F (190°C) for optimal browning and cooking.
- Thermometer is King: Use a meat thermometer to ensure the chicken reaches an internal temperature of 165°F (74°C).
- Rest and Enjoy: Let the chicken rest for 5 minutes before slicing and serving to allow the juices to redistribute.
Why is brining the chicken important for air frying?
Brining helps the chicken retain moisture during the cooking process, preventing it from becoming dry in the intense heat of the air fryer. The salt in the brine denatures proteins allowing them to hold more water.
What makes panko breadcrumbs superior to other types of breadcrumbs for this recipe?
Panko breadcrumbs have a larger size and irregular shape, which creates a more satisfying and crispy texture compared to finer breadcrumbs.
What is the ideal internal temperature for the chicken, and why is it important to check?
The ideal internal temperature for the chicken is 165°F (74°C). Checking with a meat thermometer ensures the chicken is cooked through without overcooking and becoming dry.
Why is it important not to overcrowd the air fryer basket when cooking the chicken?
Overcrowding prevents proper air circulation, which is essential for even cooking and achieving a crispy coating. Cook the chicken in a single layer with enough space for air to circulate around each piece.
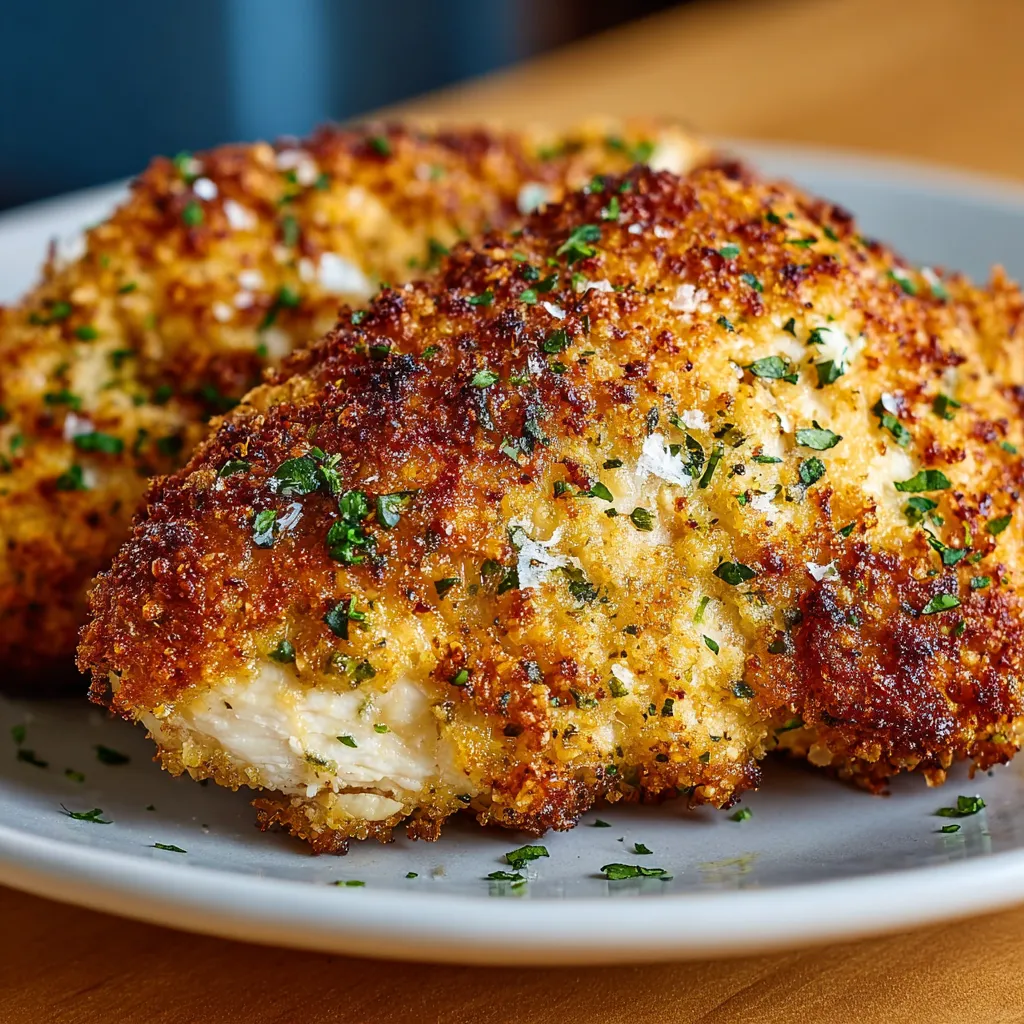
Ultimate Garlic Parmesan Air Fryer Chicken
This recipe delivers perfectly cooked, intensely flavorful garlic parmesan air fryer chicken every time. Brining ensures juicy chicken, while a panko and parmesan coating provides a satisfying crisp. Follow these steps for a foolproof method to achieve crispy and tender chicken in your air fryer.
Ingredients
Equipment
Method
- Brine the Chicken: In a large bowl, whisk together the water, salt, sugar, minced garlic, and cracked peppercorns until the salt and sugar are dissolved. Submerge the chicken breasts in the brine, ensuring they are fully covered. Cover the bowl and refrigerate for at least 30 minutes, or up to 2 hours.
- Prepare the Garlic Parmesan Coating: In a shallow dish, combine the grated Parmesan cheese, panko breadcrumbs, olive oil, minced garlic, Italian seasoning, garlic powder, onion powder, and red pepper flakes (if using). Mix well until all ingredients are evenly distributed. Season with salt and pepper to taste.
- Prepare the Chicken: Remove the chicken breasts from the brine and pat them completely dry with paper towels.
- Coat the Chicken: Dredge each chicken breast in the garlic parmesan mixture, pressing firmly to ensure the coating adheres well. Make sure the chicken is completely covered on all sides.
- Air Fry the Chicken: Preheat your air fryer to 380°F (190°C). Lightly grease the air fryer basket with cooking spray. Place the coated chicken breasts in the air fryer basket in a single layer, ensuring they are not overcrowded. You may need to cook them in batches.
- Cook the Chicken: Air fry for 12-15 minutes, flipping halfway through, or until the internal temperature reaches 165°F (74°C). Cooking time may vary depending on the thickness of the chicken breasts and the model of your air fryer.
- Rest and Serve: Once the chicken is cooked through, remove it from the air fryer and let it rest for 5 minutes before slicing and serving.
- Garnish (Optional): Sprinkle with extra grated Parmesan cheese and chopped fresh parsley for garnish.
Notes
For best results, use freshly grated Parmesan cheese. Ensure chicken breasts are pounded to an even thickness for even cooking. Patting the chicken dry after brining is crucial for a crispy coating. Do not overcrowd the air fryer basket; cook in batches if necessary. A meat thermometer is essential to ensure the chicken reaches an internal temperature of 165°F (74°C) without overcooking. Leftovers can be stored in an airtight container in the refrigerator for up to 3 days. Reheat in the air fryer for best results.
")