Decoding the Crispy-Juicy Paradox: The Science Behind the Bird
The quest for perfectly baked chicken drumsticks is a battle against two primary enemies: soggy skin and dry meat. These seemingly simple issues are governed by the principles of heat transfer and protein denaturation.- Maillard Reaction & Skin Crispness: Achieving crispy skin relies heavily on the Maillard reaction, a chemical reaction between amino acids and reducing sugars that occurs at high temperatures. This reaction not only creates the desirable browning and crisping but also contributes to the complex, savory flavors we crave. For the Maillard reaction to occur efficiently, the surface of the chicken needs to be relatively dry. Excess moisture hinders the reaction, leading to steaming rather than browning.
- Protein Denaturation & Meat Juiciness: Chicken meat is primarily composed of protein. As the internal temperature of the chicken rises, these proteins begin to denature, or unravel. This process causes the meat to contract and release moisture. The key is to cook the chicken to a safe internal temperature (165°F or 74°C) without overcooking, which would result in excessive moisture loss and dry, tough meat.
- The Role of Fat: Chicken skin contains a significant amount of fat. As the chicken cooks, this fat renders, or melts, and helps to baste the meat, keeping it moist and adding flavor. Rendering the fat also contributes to crispy skin by further drying out the surface.
- Even Cooking: Ensuring even cooking is crucial for both crispy skin and juicy meat. Uneven cooking can lead to some parts of the chicken being overcooked and dry while others are undercooked and unsafe to eat. This is influenced by the way you position the chicken, and the efficiency of heat circulation in your oven.
The Champion Drumstick Recipe
 This recipe encapsulates everything I’ve learned on my drumstick journey. It’s simple, effective, and produces consistently delicious results.
Ingredients:
- 12 Chicken Drumsticks (about 3 pounds)
- 2 tablespoons Olive Oil
- 1 tablespoon Paprika
- 1 teaspoon Garlic Powder
- 1 teaspoon Onion Powder
- 1 teaspoon Dried Thyme
- 1/2 teaspoon Salt
- 1/4 teaspoon Black Pepper
Equipment:
- Baking Sheet
- Wire Rack (optional, but recommended)
- Meat Thermometer
Instructions:
- Prepare the Chicken: Pat the chicken drumsticks thoroughly dry with paper towels. This is a crucial step for achieving crispy skin.
- Season the Chicken: In a large bowl, whisk together the olive oil, paprika, garlic powder, onion powder, dried thyme, salt, and pepper. Add the chicken drumsticks to the bowl and toss to coat evenly with the seasoning mixture. Ensure every nook and cranny is covered.
- Arrange on Baking Sheet: Place a wire rack on a baking sheet. Arrange the chicken drumsticks on the wire rack in a single layer, making sure they are not touching each other. The wire rack allows air to circulate around the drumsticks, promoting even cooking and crispier skin. If you don’t have a wire rack, you can place them directly on the baking sheet, but be sure to flip them halfway through cooking.
- Bake: Preheat your oven to 400°F (200°C). Bake the chicken drumsticks for 40-45 minutes, or until the internal temperature reaches 165°F (74°C) when measured with a meat thermometer inserted into the thickest part of the drumstick, avoiding the bone.
- Rest: Remove the chicken drumsticks from the oven and let them rest for 5-10 minutes before serving. This allows the juices to redistribute, resulting in more tender and flavorful meat.
My Drumstick Odyssey: A Culinary Investigation
My path to perfect oven-baked chicken drumsticks wasn’t always smooth. My first few attempts were a disaster, filled with soggy skin, undercooked interiors, and a general sense of culinary failure. But each mistake was a valuable lesson, leading me closer to the ultimate drumstick.The Soggy Skin Saga: My Initial Blunder
Initially, I thought simply tossing the drumsticks in seasoning and throwing them in the oven would suffice. I couldn’t have been more wrong. The chicken came out looking pale and unappetizing, with skin that was more rubbery than crispy. This was my first encounter with the importance of drying the chicken thoroughly. I realized that the moisture on the skin was preventing the Maillard reaction from occurring.The Undercooked Nightmare: Temperature Troubles
Then came the undercooked phase. I was so focused on avoiding dry meat that I pulled the chicken out of the oven too early. A quick probe with a meat thermometer revealed that the internal temperature was nowhere near the safe 165°F (74°C). This experience reinforced the necessity of using a meat thermometer to ensure food safety.The “Aha!” Moment: Rack and Roll
The turning point came when I started using a wire rack. Like many home cooks, I initially baked directly on the baking sheet. Then, I had an “Aha!” moment after reading an article about proper airflow in ovens. Elevating the chicken on a wire rack allowed hot air to circulate around each drumstick, promoting even cooking and crisping the skin on all sides. This simple change made a world of difference.The Seasoning Symphony: Perfecting the Flavor Profile
Experimentation with different seasoning blends also played a crucial role. While salt and pepper are essential, I found that paprika, garlic powder, onion powder, and dried thyme created a harmonious blend of flavors that complemented the chicken perfectly. The paprika also contributed to a beautiful, reddish-brown color.The Foolproof Formula: Mastering the Technique
After countless iterations, I’ve distilled the process into a simple, repeatable technique that guarantees crispy skin and juicy meat every time.- Dry, Dry, Dry: Pat the chicken drumsticks thoroughly dry with paper towels. This is non-negotiable.
- Generous Seasoning: Don’t be shy with the seasoning. Coat the drumsticks evenly and generously.
- Rack ‘Em Up: Use a wire rack to elevate the chicken and promote even air circulation.
- Temperature is Key: Use a meat thermometer to ensure the internal temperature reaches 165°F (74°C).
- Rest and Relax: Let the chicken rest for 5-10 minutes before serving to allow the juices to redistribute.
Why is it important to dry the chicken drumsticks thoroughly before baking?
Drying the chicken drumsticks thoroughly with paper towels is crucial for achieving crispy skin. Excess moisture hinders the Maillard reaction, which is responsible for browning and crisping, leading to steaming instead.
What internal temperature should chicken drumsticks reach to be considered safe to eat?
Chicken drumsticks should reach an internal temperature of 165°F (74°C) when measured with a meat thermometer to ensure they are safe to eat.
Why is a wire rack recommended when baking chicken drumsticks?
A wire rack allows air to circulate around the drumsticks, promoting even cooking and crisping the skin on all sides. If a wire rack isn’t available, the drumsticks should be flipped halfway through cooking.
How long should the chicken drumsticks rest after baking, and why?
The chicken drumsticks should rest for 5-10 minutes after baking. This allows the juices to redistribute, resulting in more tender and flavorful meat.
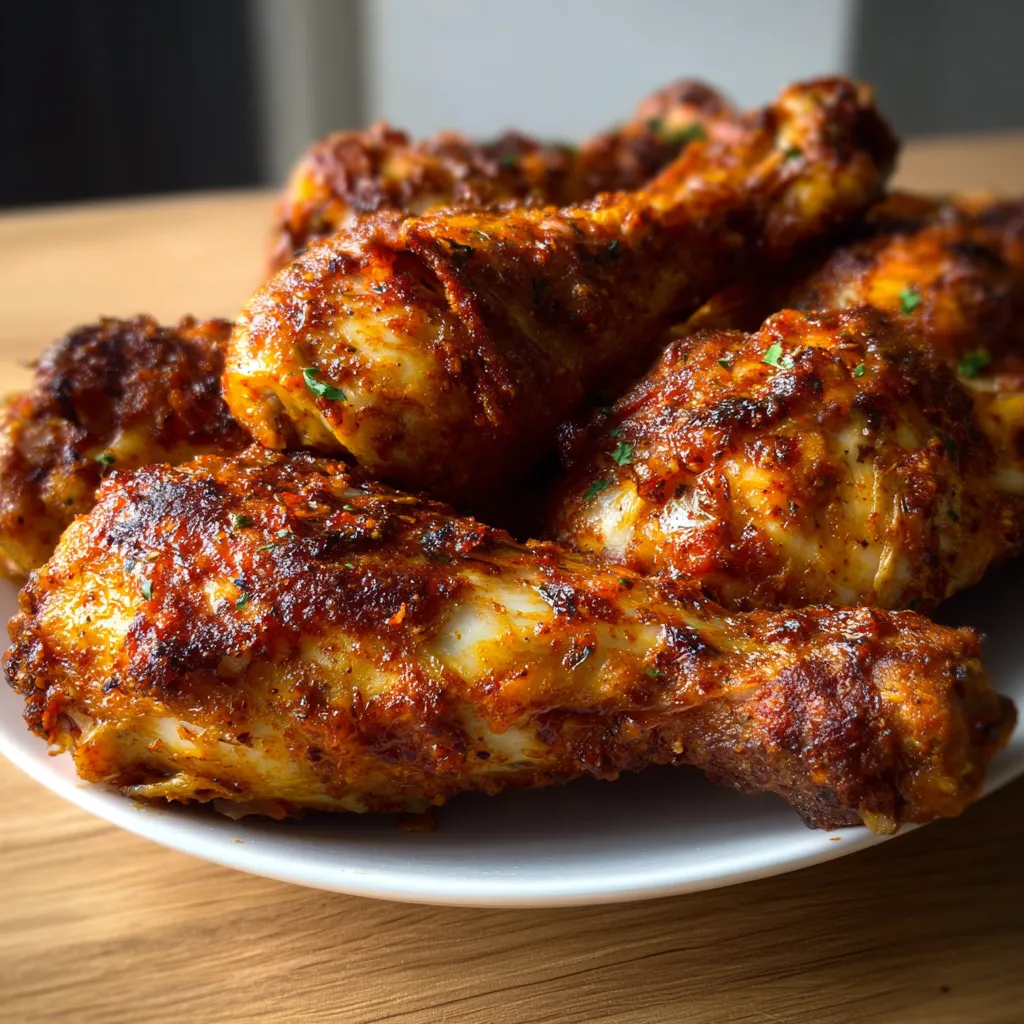
Easy Oven Baked Chicken Drumsticks
Achieve perfectly crispy skin and juicy meat with these easy oven-baked chicken drumsticks. This recipe uses simple techniques and readily available ingredients to create a flavorful and satisfying meal.
Ingredients
Equipment
Method
- Prepare the Chicken: Pat the chicken drumsticks thoroughly dry with paper towels. This is a crucial step for achieving crispy skin.
- Season the Chicken: In a large bowl, whisk together the olive oil, paprika, garlic powder, onion powder, dried thyme, salt, and pepper. Add the chicken drumsticks to the bowl and toss to coat evenly with the seasoning mixture. Ensure every nook and cranny is covered.
- Arrange on Baking Sheet: Place a wire rack on a baking sheet. Arrange the chicken drumsticks on the wire rack in a single layer, making sure they are not touching each other. The wire rack allows air to circulate around the drumsticks, promoting even cooking and crispier skin. If you don’t have a wire rack, you can place them directly on the baking sheet, but be sure to flip them halfway through cooking.
- Bake: Preheat your oven to 400°F (200°C). Bake the chicken drumsticks for 40-45 minutes, or until the internal temperature reaches 165°F (74°C) when measured with a meat thermometer inserted into the thickest part of the drumstick, avoiding the bone.
- Rest: Remove the chicken drumsticks from the oven and let them rest for 5-10 minutes before serving. This allows the juices to redistribute, resulting in more tender and flavorful meat.
Notes
For extra crispy skin, ensure the chicken is very dry before seasoning. You can also broil the chicken for the last few minutes of cooking, but watch closely to prevent burning. Store leftover chicken in an airtight container in the refrigerator for up to 3 days.
")