The Alchemical Marriage of Garlic, Cheese, and Chicken
The magic of Cheesy Garlic Chicken Wraps hinges on the Maillard reaction, that browning process that occurs when amino acids and reducing sugars are heated. This reaction is what gives the chicken its savory, caramelized flavor. Garlic, of course, adds its pungent bite, mellowing beautifully as it cooks. The cheese provides a creamy, salty counterpoint, binding everything together. Choosing the right cheese is crucial. A good melting cheese, like Monterey Jack or mozzarella, ensures a smooth, gooey texture. The wrap itself plays a role, providing a neutral base that allows the flavors of the filling to shine. Heating the wrap slightly before filling makes it more pliable and prevents it from cracking when folded. Furthermore, the interplay between moisture content and heat distribution is paramount; too much moisture and the wrap becomes soggy, too little and the ingredients remain stubbornly separate, failing to meld into a cohesive whole.The Grand Recipe: Cheesy Garlic Chicken Wraps
 This recipe aims for the perfect balance of flavor, texture, and ease of preparation.
Ingredients:
- 1 pound boneless, skinless chicken breasts, cut into ½-inch cubes
- 2 tablespoons olive oil
- 4 cloves garlic, minced
- 1 teaspoon Italian seasoning
- ½ teaspoon salt
- ¼ teaspoon black pepper
- 1 cup shredded Monterey Jack cheese (or mozzarella)
- ½ cup mayonnaise
- ¼ cup grated Parmesan cheese
- 4 large flour tortillas
- 2 tablespoons butter, melted (optional, for toasting)
Instructions:
- Prepare the Chicken: In a medium bowl, toss the chicken cubes with 1 tablespoon olive oil, minced garlic, Italian seasoning, salt, and pepper. Ensure the chicken is evenly coated with the spices.
- Cook the Chicken: Heat the remaining 1 tablespoon of olive oil in a large skillet over medium-high heat. Add the chicken and cook, stirring occasionally, until it is cooked through and lightly browned on all sides (about 5-7 minutes). Be careful not to overcrowd the pan; cook in batches if necessary to ensure even browning.
- Make the Garlic Cheese Sauce: In a separate bowl, combine the mayonnaise and grated Parmesan cheese. Mix well until smooth and creamy. This sauce provides a tangy, cheesy counterpoint to the savory chicken.
- Assemble the Wraps: Warm the tortillas in a dry skillet or microwave for a few seconds each to make them more pliable. Spread a thin layer of the garlic cheese sauce evenly over each tortilla. Top with ¼ of the cooked chicken and ¼ of the shredded Monterey Jack cheese.
- Fold the Wraps: Fold in the sides of the tortilla, then tightly roll it up from the bottom.
- Toast the Wraps (Optional): Brush the outside of each wrap with melted butter (if using). Heat a large skillet over medium heat. Place the wraps in the skillet, seam-side down, and cook for 2-3 minutes per side, or until golden brown and crispy. This step adds a delightful textural contrast.
- Serve: Cut the wraps in half and serve immediately. These are best enjoyed warm, when the cheese is melty and the chicken is juicy.
My Quest for the Perfect Wrap: A Culinary Detective Story
My initial foray into Cheesy Garlic Chicken Wraps was, to put it mildly, disappointing. The chicken was dry, the garlic overpowering, and the tortillas stubbornly refused to cooperate. Like many of you, I initially thought it was just a matter of throwing ingredients together. I was so wrong.The Case of the Dry Chicken
My first few attempts were a disaster. The chicken was consistently overcooked and dry. I’d thought that searing it quickly over high heat was the key to flavor, but it only resulted in tough, flavorless meat.The “Aha!” Moment: Low and Slow Wins the Race
Then, I had an “Aha!” moment. Instead of blasting the chicken with high heat, I tried cooking it more gently over medium heat. The result? Juicy, tender chicken that retained its moisture. The lower temperature also allowed the garlic to mellow and infuse the chicken with its flavor without becoming acrid. I also realized the importance of cutting the chicken into smaller, uniform pieces. This ensured even cooking and prevented some pieces from drying out while others remained undercooked.The Garlic Gauntlet: Taming the Bite
The garlic presented another challenge. Initially, I used too much, resulting in wraps that were aggressively pungent. It overpowered everything else.The Solution: Mincing is Key
I experimented with different forms of garlic: chopped, sliced, and minced. Mincing, I discovered, was the key. It released the garlic’s flavor more evenly and allowed it to meld seamlessly with the other ingredients. Also, adding the garlic to the pan *after* the chicken had started cooking prevented it from burning and becoming bitter.The Tortilla Tango: Achieving Flexibility
My first few wraps were brittle and cracked when I tried to fold them. They looked more like broken spring rolls than satisfying wraps.The Revelation: A Gentle Warmth
The solution was simple: gently warming the tortillas before filling them. A few seconds in a dry skillet or microwave made them wonderfully pliable, allowing me to fold them without any cracking or tearing. Brushing the outside with melted butter before toasting also added a delightful crispness and golden-brown color.The Foolproof Method: A Recipe for Success
After much experimentation and (a few) culinary mishaps, I’ve distilled the process down to a few key steps. Follow these, and you’ll be enjoying perfect Cheesy Garlic Chicken Wraps every time.- Gentle Cooking is Key: Cook the chicken over medium heat to retain moisture and prevent it from drying out.
- Mince Your Garlic: This ensures even flavor distribution and prevents bitterness. Add it to the pan after the chicken has started cooking.
- Warm the Tortillas: A few seconds in a dry skillet or microwave will make them pliable and prevent cracking.
- Don’t Overfill: Resist the urge to stuff the wraps too full. This will make them difficult to fold and may cause them to burst.
- The Right Cheese: Opt for good melting cheese like Monterey Jack.
- Toast for Texture: Brushing the outside of the wraps with melted butter (optional) and toasting them in a skillet adds a delightful crispness.
Why is it important to warm the tortillas before assembling the Cheesy Garlic Chicken Wraps?
Warming the tortillas makes them more pliable, preventing them from cracking or tearing when folded. A few seconds in a dry skillet or microwave is sufficient.
What type of cheese is recommended for Cheesy Garlic Chicken Wraps, and why?
A good melting cheese like Monterey Jack or mozzarella is recommended. These cheeses melt smoothly, providing a gooey texture that binds the filling together.
How should the chicken be cooked to prevent it from becoming dry?
Cook the chicken over medium heat instead of high heat to retain moisture. Cutting the chicken into smaller, uniform pieces also ensures even cooking and prevents dryness.
How can I prevent the garlic from overpowering the other flavors in the wrap?
Mince the garlic instead of chopping or slicing it, and add it to the pan after the chicken has started cooking. This prevents the garlic from burning and becoming bitter, ensuring a more balanced flavor.
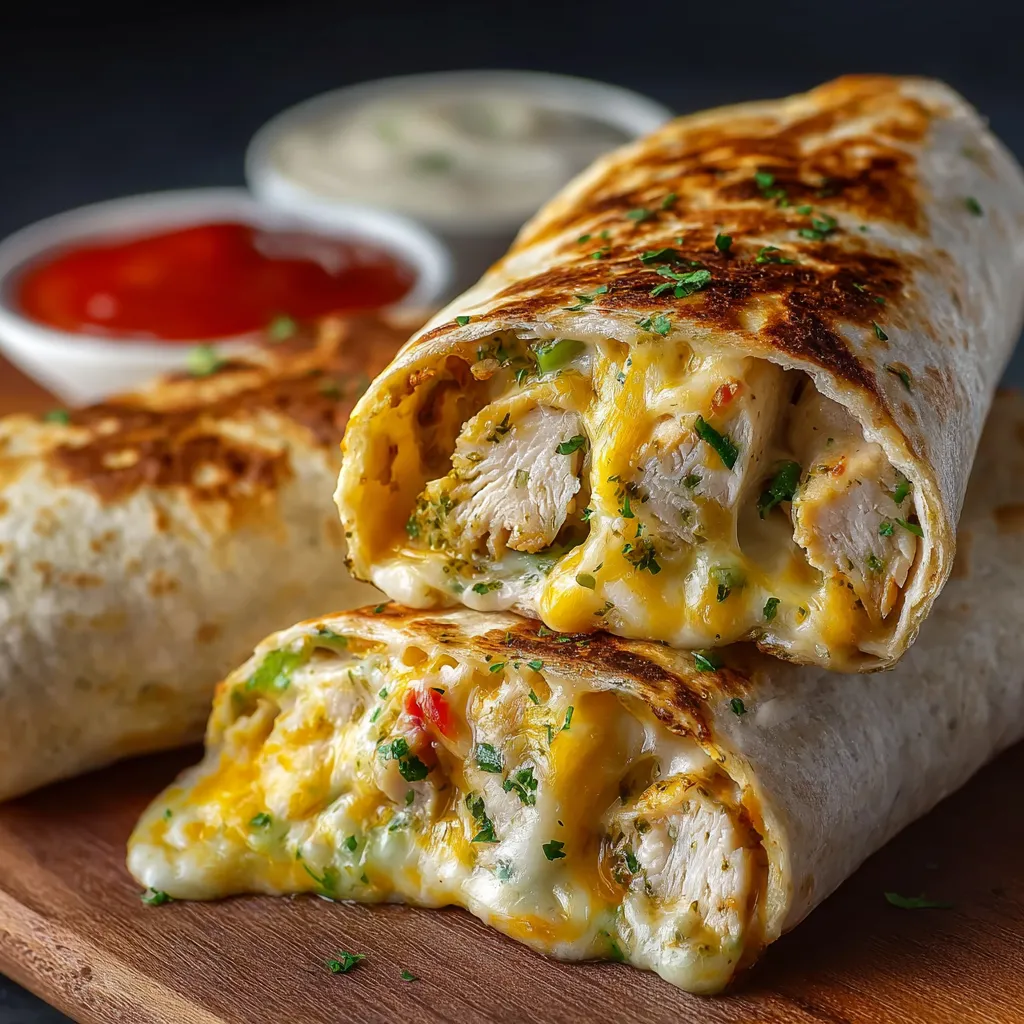
Cheesy Garlic Chicken Wraps
These cheesy garlic chicken wraps are an easy and delicious meal, perfect for a quick lunch or dinner. Tender chicken is cooked with garlic and spices, then combined with a creamy cheese sauce and wrapped in warm tortillas. Toasting the wraps adds a delightful golden crispness.
Ingredients
Equipment
Method
- In a medium bowl, toss the chicken cubes with 1 tablespoon olive oil, minced garlic, Italian seasoning, salt, and pepper. Ensure the chicken is evenly coated with the spices.
- Heat the remaining 1 tablespoon of olive oil in a large skillet over medium-high heat. Add the chicken and cook, stirring occasionally, until it is cooked through and lightly browned on all sides (about 5-7 minutes). Be careful not to overcrowd the pan; cook in batches if necessary to ensure even browning.
- In a separate bowl, combine the mayonnaise and grated Parmesan cheese. Mix well until smooth and creamy.
- Warm the tortillas in a dry skillet or microwave for a few seconds each to make them more pliable.
- Spread a thin layer of the garlic cheese sauce evenly over each tortilla. Top with ¼ of the cooked chicken and ¼ of the shredded Monterey Jack cheese.
- Fold in the sides of the tortilla, then tightly roll it up from the bottom.
- Brush the outside of each wrap with melted butter (if using). Heat a large skillet over medium heat. Place the wraps in the skillet, seam-side down, and cook for 2-3 minutes per side, or until golden brown and crispy.
- Cut the wraps in half and serve immediately.
Notes
For best results, cook the chicken over medium heat to keep it moist. Mincing the garlic is key to even flavor distribution. Warmed tortillas are easier to fold. Monterey Jack or mozzarella cheese are excellent choices for melting. These are best enjoyed warm, when the cheese is melty and the chicken is juicy.
")